How to Draw Realistic Tears: Easy Step-by-Step Guide
Capturing emotion in art starts with the eyes. This tutorial is perfect for young artists ages 7+ looking to add expressive, watery details to their portraits. All you need is a pencil, an eraser, and a piece of paper to bring these realistic tears to life.
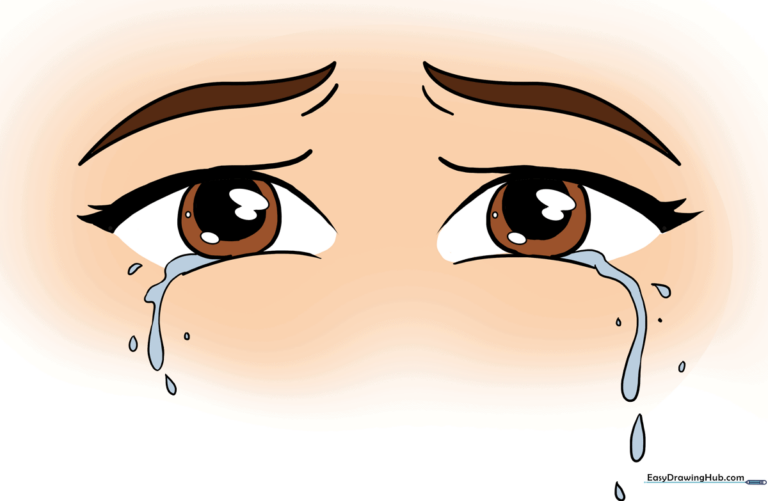
🎯 Final Result
Step-by-Step Instructions
Step 1: Sketching the Upper Eyelid

Draw two curved lines that meet at a sharp point to form the upper lid. Tip: Keep your pencil pressure light so you can easily adjust the shape later if it looks too stiff.
Step 2: Mirroring the Eyelid

Repeat the process to draw the second eye. Tip: Try to keep the eyes symmetrical, but don't worry if they aren't perfect—real faces have natural variations!
Step 3: Adding Lashes and Lower Lids

Add tiny triangles to the outer corners for lashes and a curved line below for the lower lid. Tip: Use quick, flicking motions with your pencil to make the lashes look natural and sharp.
Step 4: Drawing the Iris

Draw a circle between the lids to form the iris. Tip: Make sure the circle is partially hidden by the upper lid to give the eye a more realistic, relaxed look.
Step 5: Brows and Emotion

Draw the eyebrows with sharp points and add a small curved line beneath each to show a 'sad' expression. Tip: Think about how your own eyebrows move when you feel sad; mimicking that movement helps the drawing feel authentic.
Step 6: First Tear

Draw an elongated, irregular shape falling from one eye, followed by a smaller teardrop shape below it. Tip: Keep the edges slightly wavy to make the tear look like liquid.
Step 7: Second Tear

Repeat the process for the other eye. Tip: Vary the size of the teardrops to make the drawing look more dynamic and natural.
Step 8: Adding Detail

Add a few more teardrops around the eyes. Tip: Don't overdo it! A few well-placed drops are more effective than filling the whole page.
Step 9: Final Touches

Draw the pupil and add small circles inside to represent light reflections. Tip: Leaving a small white circle (highlight) inside the pupil is the secret to making eyes look 'alive' and watery.
Step 10: Color and Complete

Color your drawing! Tip: Use light blues for the tears to make them stand out. Once you're done, try drawing a nose or mouth to complete your expressive face.
More Tutorials


