How to Draw Anime Hair: Easy Step-by-Step Guide
Ready to bring your anime characters to life? This guide is designed for artists ages 8+ to master the flow and volume of anime-style hair. All you need is a pencil, an eraser, and a sheet of paper to begin creating expressive, professional-looking hairstyles.
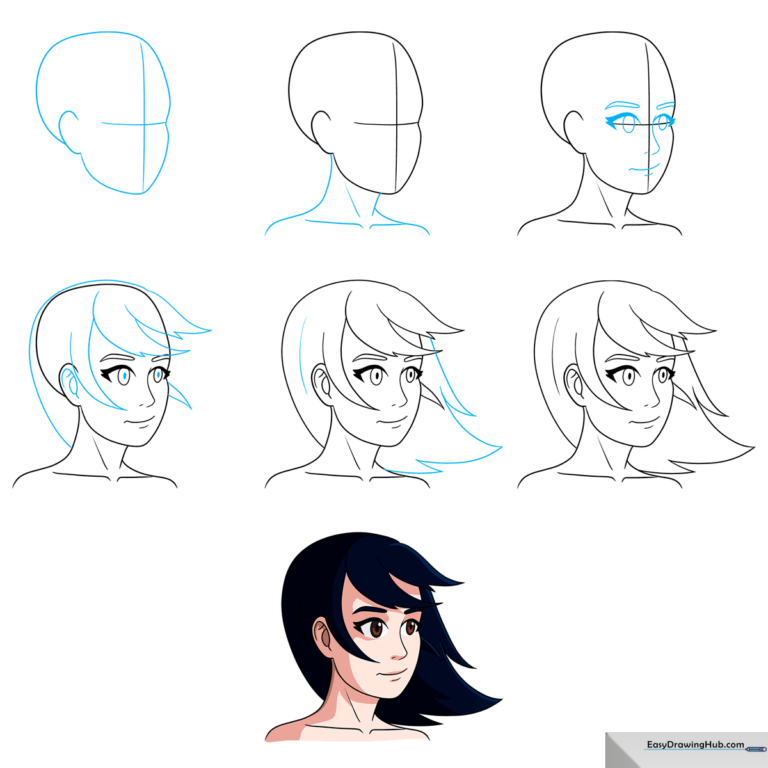
🎯 Final Result
Step-by-Step Instructions
Step 1: Establishing the Head Shape

Draw the face in a 3/4 perspective using a light grid. Use curved lines to outline the head, ear, and jawline. Teacher's Tip: Keep your pencil pressure very light here—these are just structural guidelines that we will erase later, so don't press too hard!
Step 2: Adding the Neck and Shoulders

Use smooth, flowing curved lines to draw the neck and shoulders. Focus on the natural slope of the collarbones. Teacher's Tip: Think of the neck as a cylinder; keep the lines slightly curved to suggest depth rather than drawing a flat, straight line.
Step 3: Sketching Facial Features

Position the eyes on the horizontal grid line, using bold ovals for the irises. Add simple, neutral eyebrows and a small, curved line for the nose and mouth. Teacher's Tip: Anime eyes are all about expression—keep the upper lash line thicker than the bottom to give the eyes a 'pop' effect.
Step 4: Designing the Hairline

Erase your construction grid. Now, sketch the hair using long, spiky sections that meet at sharp points. Add pupils to the eyes. Teacher's Tip: Don't draw every single strand of hair; focus on 'clumps' or 'locks' of hair to keep the style looking clean and stylized.
Step 5: Adding Length and Texture

Refine the hair by adding longer, sweeping lines that flow down the shoulders. Ensure the ends of the hair taper to sharp points. Teacher's Tip: Vary the length of your lines to create a sense of movement, as if the hair is blowing slightly in the wind.
Step 6: Final Shading

Fill in the hair with dark shading to give it volume and contrast. Teacher's Tip: Leave small, thin white gaps or 'highlights' in the hair to represent light reflecting off the surface—this is the secret to making anime hair look shiny and professional!
More Tutorials


