How to Draw an Orchid: Easy 10-Step Guide for Kids
Bring the elegance of nature to your sketchbook with this simple orchid tutorial, perfect for young artists ages 6 and up. All you need is a pencil, an eraser, and your favorite coloring supplies to get started. Follow these steps to master the unique, layered structure of this exotic flower while building your confidence as an artist.
🎯 Final Result

Step-by-Step Instructions
Step 1: Sketching the Base Petals

Begin by drawing two curved lines that slant toward each other like a wide 'V'. Teacher's Tip: Keep your pencil pressure light here; these are just guidelines to help you find the center of your flower.
Step 2: Shaping the Side Petals

Extend a curved line outward from each diagonal line and loop it back toward the center. Teacher's Tip: Try to make these symmetrical to give your orchid a balanced, professional look.
Step 3: Adding the Sepals

Draw one curved line above the petals to create the top sepal, and two more below for the bottom sepals. Teacher's Tip: Orchids have unique shapes, so don't worry if your lines aren't perfectly smooth—nature is full of interesting curves!
Step 4: Drawing the Flower Column

Sketch a small circle in the center, leaving the bottom open, and add an irregular shape beneath it. Teacher's Tip: This is the 'heart' of the flower. Use a sharp pencil to keep these small details clean.
Step 5: Defining the Labellum

Enclose a triangular, wavy shape around the bottom of the column to form the labellum (the lip). Teacher's Tip: The labellum is the most distinct part of an orchid—make it look soft and ruffled by using slightly wavy lines.
Step 6: Sketching the Throat

Add two small, irregular shapes on either side of the column to create the flower's throat. Teacher's Tip: Keep these shapes small; they add depth to the center of your flower.
Step 7: Adding Texture and Detail

Add delicate lines along the petals and small dots on the column. Teacher's Tip: Use short, light strokes for the petal veins to make them look realistic and organic.
Step 8: Drawing the Stem

Extend two long, parallel curved lines downward from the base of the flower. Teacher's Tip: Make the stem slightly thicker at the top where it meets the flower to show stability.
Step 9: Adding the Leaf
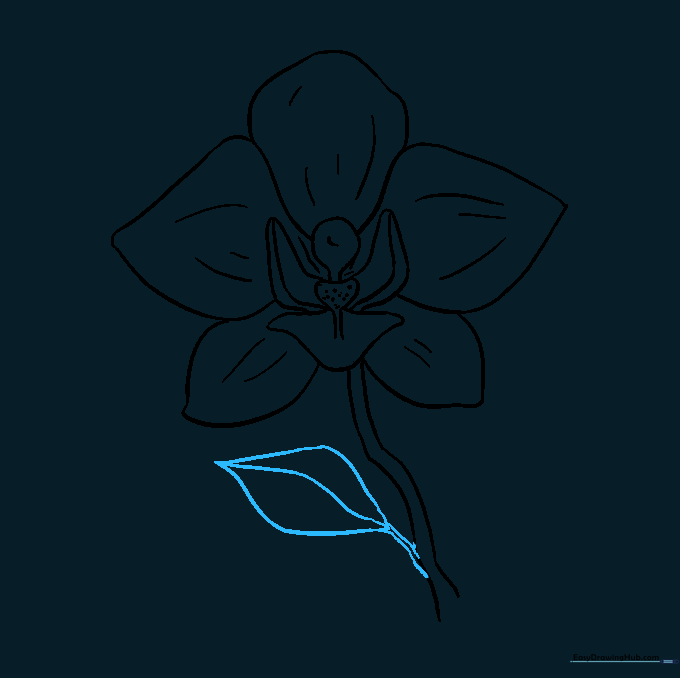
Draw a long, pointed leaf shape extending from the stem with a central vein line. Teacher's Tip: Orchids have long, slender leaves. Keep your lines smooth and tapered at the end.
Step 10: Bringing Your Orchid to Life with Color

Time to color! Use vibrant pinks, purples, or whites to fill in your orchid. Teacher's Tip: Try blending two colors on the petals to create a soft, natural gradient effect.
More Tutorials


